General
A variety of standard as well as special mounting methods are available to suit virtually any installation.
Standard Mounting Methods
Hardware (included with order)
- Full size paper mounting template
- 3/8″ diameter x 3″ long threaded brass studs (for trunk)
- 1″ long metal spacers (for tree top)
- 3/16″ diameter Toggler® bolts or 10-24 x 4″ long machine screws & expansion sleeves (for tree top)
Traditional/Contemporary Trunk
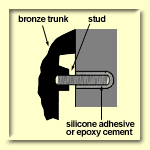
All cast bronze or cut out brass trunks are furnished with concealed threaded studs, appropriate to mount to any type of wall surface.
Mounting Steps
- Tape paper template on wall; mark drilling locations on the wall through the template
- For hollow wall construction, use a 3/8″ drill bit to drill the holes for the trunk only. Be sure to keep the paper template on the wall until after the holes for the trunk are drilled, and drill completely through the wall material
- For solid walls, use a 3/8″ diameter drill bit to drill the hole to a depth slightly deeper than the length of the brass studs. If possible, re-drill this hole with the next larger size drill bit, but do not drill quite as deep. This will leave a tighter fit at the end of each hole to better secure the hardware
- After you confirm that the holes line up, apply either silicone sealant/adhesive or a construction grade adhesive to each stud, around each of the drilled holes and on the flat areas on the back of the casting near the base
- Press the trunk into position, making sure it is flush against the wall by pounding the face with a padded block and rubber mallet, if necessary
Trunk Mounting Method

All recognition tree tops are cut from 1/4″ solid acrylic sheet. The mounting holes are predrilled and are concealed behind selected brass leaves.
Mounting Steps
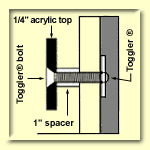
For hollow walls, use a 1/2″ drill bit to drill the Toggler® bolt holes. Togglers® were designed so that the “butterfly” metal channels on the inside of the hollow wall stay in place, even after the bolt is removed. To install, insert the metal channel into the hole in the wall and tug on the plastic pull ring. Once the plastic cap is flush with the face of wall, snap the plastic legs off by pushing outward
Tree Top Hollow Wall Installation

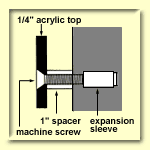
Tree Top Solid Wall Installation

- Before installing the acrylic, be sure to clean the back with an anti-static cleaner to remove or inhibit dust build-up
- Insert either the Toggler® bolts or the machine screws through the face of the acrylic top with a 1″ spacer sleeve behind each bolt. After all bolts and spacers are aligned, tighten each screw securely, being careful not to overtighten
- Attach the remainder of the leaves to cover the mounting screws
